Thursday, August 26, 2010

Decorating with Chocolate!

It's true, I have an addiction problem. Passed down to me from my dear mum, my only vice is...chocolate. Which is why, for her birthday, I decided to go on a quest to find the best way to fit the most chocolate anyone has ever put in, and on, a cake. Forget frosting, every detail you see on this cake is made from melted chocolate. (Except for the one strawberry in the middle. Look mom! Fruit! It's healthy, really!)

Oh yes. This is ALL chocolate.

As I mentioned in my last post, my goal is to make this a blog for normal people. You know, the ones who come home from ten hour work days and then plan on roasting an entire chicken and making cilantro rolls and  a summer strawberry salad and fondant covered penguin cupcakes for dessert. Oh, wait, who has time for that? Sure, we may get ambitious once a month or so, but who has the time to spend six hours making dinner on a weekday? Or baking and decorating a three tiered cake for a 2 year old's birthday?

So welcome to the cheater method. This is a blog that includes all of the fun parts: decorating, tweaking simply recipes to make them tastier, and, quite simply, baking. I fully admit to using cake mixes and canned frosting, phyllo dough and pre packaged croissants. The main goal of baking is to make something tasty, right? Let some massive corporate company play with flour and baking soda. I'm going to spend my quality time with the details. Frosting, chocolate, sprinkles, fruit fillings.

This said, time to move on to the cake!

Chocolate, Strawberry, and MORE Chocolate cake!
Ingredients:
1 Box Triple Chocolate Cake Mix
1 Can Dark Chocolate Frosting
1 Bag Semi-Sweet Chocolate Chips
1 Bag White Chocolate Chips
Strawberries (or fruit of your choice)
Sugar

Tools:
Squeeze Bottles (Available at JoAnn Fabrics)
Foil
Rolling Pin
Cookie Sheets (Or something else to catch dripping chocolate)
Frosting Spatula


Just because I use box cake mixes, doesn't mean I don't add a little to them. The triple chocolate mix I found includes them already, otherwise I always add mini chocolate chips to chocolate cake mixes. You can add walnuts, sprinkles to create funfetti, a bit of already brewed coffee to make it more moist. More tricks like this to come later.

So for this, I had a box of strawberries, begging to be eaten. So, I rewarded their tasty looks by smashing them into a pulp.

Messy, but delicious!
Pick your favorite fruit, take a potato masher, fork, sledge hammer, or whatever tool of choice is and get it as close to frosting consistency as you can. Add sugar if it's a sour fruit, though not too much. It's a great way to sneak something mildly healthy into your cake and hold the layers together.

Once you have the layers together, frost as you normally would. It takes about one can of frosting for two nine inch rounds. To smooth the frosting, use a flat frosting spatula, dip it in water, and then spread the frosting on the cake. It turns out looking like this:
Not quite fondant smooth, but not bad, either!

And now, for my favorite part of this cake. Put the semi-sweet chips in one bowl, the white in another. Melt both in the microwave, and have a squeeze bottle full of white chocolate and a bottle full of dark chocolate. I used about half a bag of each type of chips.

For the decorations around the edges, place foil over a rolling pin, as seen below. Drizzle both chocolate types in about inch thick arches. Your goal is to not let the arches touch. You need to make sure there are no gaps between the chocolate types in each arch, otherwise getting them off the rolling pin unbroken will be very difficult.

Method courtesy of Essential Guide to Cake Decorating

Second, set several sheets of foil flat on the table. I made all of the stars, curlicues, leaves, and letters using this method. All you do is drizzle the chocolate in the design you want. If you have a design you want to trace, use plastic wrap or wax paper instead of foil.


Keep in mind, the side of these candies that you'll want showing on the cake is the side currently touching the foil. See those leaves? They look terrible on this side, but since you have the dark chocolate outline and the white is just filling, what is technically the bottom can be as messy as you want.

For lettering, remember, you need to write all of the letters backwards so you can flip them and have them be readable on the cake itself. Guess who didn't realize this until she had to redo most of them?

For decorations like these, a few things are key to remember. You need to be able to remove these with a spatula later, the curlicues above were too delicate to do this well. Make several layers of chocolate, and keep the decorations in the freezer until you are going to place them on the cake. Yes, this means the cake should go in the fridge until serving, just to be safe.

Always make more decorations than you will need! Some will break, or fall off, or look funny. I ended up not having enough unbroken curlicues which was this cake's main flaw.

But all in all, it was fantastic, both looking and tasting. Experiment with your decorations! Just free hand a few, and see how they turn out. Make sure you peel them off of the foil with a spatula, and very slowly.


Sorry for the blurry details on the last one, but I had to show you the curlicues on the sides and the archways.

That's it for now! Have a fantastic day.

Sunday, August 22, 2010

The Baker is Back!

Eight months later, I am finally out of the dorms and into an apartment with my own kitchen! Prepare for an onslaught of brand new recipes. With a few new friends who love baking as much as I do, expect a few guest authors as well!

From now on, I will be picking ordinary recipes and tweaking them in tasty, fun ways. For example, a few weeks ago my friend Britni and I got bored with banana bread. After picking 10 pounds of strawberries, we decided Strawberry Banana Chocolate Chip Bread would be better. Expect that recipe coming up soon!

Without further ado, the grand re-opening cupcakes! When I'm feeling particularly ambitious, I'll bake a cake from scratch. Yesterday, however, was not one of those days. After all, decorating is the fun part! With Alex Barker's book, Essential Guide to Cake Decorating, I have a plethora of new fantastic ideas for cake decorating. The book was given to me for my birthday by one of my best friends and my fellow baker for the day, Simone!

This is her disdainful face. ^_^
Yesterday was my friend Larry's 20th birthday, and the book conveniently had adorable birthday cupcakes. He requested strawberry cupcakes, so I bought a box mix from the grocery store and called it a day. Really, to me, baking from scratch is more for bragging rights than lack of tasty alternatives, there's a few box mixes I prefer to any recipes I have.

So fast forward through the eggs and oil and mix bit, to the magical decorating. Apologies in advance, these are not the best photos because I was baking at night and on a deadline.


So once you have pre-made cupcakes, cover them in Royal Icing. What, you're not sure how to make royal icing? Well then, here's a guide!

Royal Icing
1 lb of Powdered Sugar
2 Egg Whites
1/2 Teaspoon Flavor Extract (Lemon, Vanilla, Almond, whatever you want!)

To make more icing, simply double the recipe. To change the consistency, simply add small amounts of water at a time. And by small, I mean increments of teaspoons or so.

Here is my trick for giving royal icing that smooth, almost fondant look. Fill a glass with water, and put your spatula or knife in it. If you spread the icing then use a very thin layer of water to smooth it out, you get a result like the blue cupcakes above.

This is the same type of icing used on those gorgeous sugar cookies that I could never figure out how to decorate. (Hint: This will be coming up soon.)

Simone and I used squeeze bottles from JoAnn's craft store to decorate these. Frosting tips are totally unnecessary if all you want is a thin line of frosting, and these are a less messy alternative to piping bags. You can buy them here.

All we did was copy from the book, so this is really a less recipe and instruction intensive post.

Three frosting colors: White, Light Blue, and Dark Blue
The book includes those shiny spherical sprinkles, but I couldn't find silver ones.
So welcome back to baking! Lots more to come!


Thursday, December 24, 2009

Nutella Truffles

That's right, I put truffles and nutella in the same sentence. Put a towel over your keyboard, you'll need it for the drool.

I made two different types of truffles. The first was honey, nutella, chocolate chips, and butter. The second was cake, nutella, and peanut butter. The latter are by far my favorites because classic truffles are a little too rich for me. The cake version is a whimsical mix of flavors that has a much lighter texture than your classic truffle while still being rich and delicious. Note: Truffles are absurdly time consuming. Not for a person who just has a half an hour they want to burn making something yummy.

First I made the cake version. My sister just graduated and we still have her sheet cake and her roommate's sheet cake. So with all of this extra marble cake around, I cheated. The recipe calls for baking your own cake, but why would I add more cake to the house? So I simply sliced off the frosting and stole some cake.

 
First you cut your cake into chunks and put it in a LARGE bowl. Then you mash it up into a nice crumble with a fork. Or if feeling particularly violent, you could probably use a hammer.


There is no need to be very picky at this point, as you can see it doesn't have to be cake dust, you just need it to be smaller. Next, you add nutella and peanut butter. You want it to be a consistency that stirs well and will shape and stay formed into spheres. For a 6x9 sheet cake, it took about a half a cup of each. Again, measurements aren't vital, you need to experiment.

This is the step that made it look like a chocolate monster ran through my kitchen in the middle of an m&m and sprinkle hurricane. Rolling the spheres is messy, awesome, and hands on. If you don't like getting your hands and kitchen messy, may I suggest Godiva? Again, I cheated. We have a lovely spoon that is meant for making spheres out of pears and melons, but it is also awesome for truffles. It is essentially an inch diameter half truffle sized spoon.

Part of the problem with truffles is you have to wait at least half an hour between each step. It is VITAL that you put them in the freezer at this point, or you will have chocolate and cake crumbles everywhere.So while these froze, I moved on to the serious truffle business.


Why yes, you did just go to chocolate heaven.

Honey Nutella Truffles
300 grams Nutella
100 grams chocolate chips
4 tbsp honey
1 tbsp ghee (or, for cheaters like me, melted butter.)

I realize the grams make things difficult. Turns out my mom had a food scale which I doubt she'll notice disappearing and ending up in my apartment for food emergencies such as this.

There is a blatant lack of pictures of these as spheres because this was absurdly messy. Why? Because the chocolate starts out at this consistency:

Did I say chocolate heaven before? Well, this is the deluxe heaven's swimming pool. At this point you need to put the bowl in the freezer unless you plan on making chocolate puddles. It takes half an hour to an hour. Then as you scoop them into balls please be aware that they will melt on your hands. The original recipe writer said to try putting butter on your hands but that sounded more difficult to wash off than chocolate.


Now for my favorite part, decorating! You can use any candy or anything you can turn into crumbs. I used m&ms, colored sugars, chocolate sprinkles, and crushed oreos. I have fancy new 99 cent squeeze bottles that I used to drizzle a mixture of powdered sugar and milk over a few of them.

Melting the chocolate and keeping it at dipping consistency was damn near impossible. Luckily about a third of the way through (aka 2 hours later) my Mom reminded me we own a fondue pot. I suggest bittersweet chocolate and if you are having difficulties, feel free to add a little milk.


All told, these took about 3 and a half hours to make and clean up after. I suggest setting them on cookie sheets covered in foil or wax paper.

These are christmas gifts for my family, so I made adorable little Not a Bakery brand boxes.


Thanks to Sunita Bhuyan and Crepes of Wrath for the wonderful recipes. They can be found here and here.

Tips for Trying:
-Keep truffles refrigerated before, during, and after making.
-Don't be afraid to experiment
-Spend the extra dollar on getting a truffle dipping tool. If you don't have one, a (well washed) bubble blowing stick could in theory work just about the same.

Tuesday, December 22, 2009

Fresh Pasta


As my friends know, and make fun of me for, I spend a ridiculous amount of time on tastespotting.com. My friend Kat introduced me to it by saying something like "say goodbye to your free time!" One of the most recent blog links was this: Making Fresh Pasta Step By Step. Being a notorious pasta fiend, I decided to try it out.

The beginning of the pasta making process is an absolute mess. Sorry for the lack of pictures, but my hands were covered in dough. Are you ready for the recipe? This is a challenge! You will be searching for these ingredients for months.

Fresh Pasta
3/4 cup flour for every...
1 large egg

Yep, that's it. Eggs and flour. End of story. Easy, right? Well, sort of.

 
So I skipped a few steps ahead, this is post dough mixing, obviously. All you do to make the dough is make a mound of flour, push it down in the middle to make a sort of bowl out of it, then add the eggs. What made this fun was I forgot that eggs are slippery and I didn't make the 'bowl' big enough. To feed a family of four and have a bit left over, I made about 6 large eggs worth of pasta. It should be rolled far thinner than I did though, so it would probably feed more. I would say maybe an egg a person, especially if I hadn't accidentally lost an egg or two worth of whites from them sliding around.

So you mix the flour and eggs with a fork, then knead it with your hands. Decently easy if you don't have escapist eggs. Once you have it to a nice consistency, you roll it into a ball, put it in plastic wrap, then let it sit for half an hour.

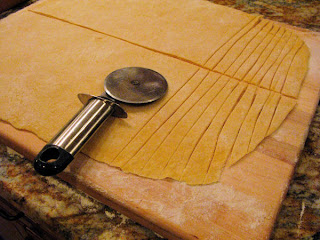
Once you roll out the dough, you can make many different types of pasta. I decided to make alfredo, so I cut fettuccine with a pizza roller. It ended up being waaay too thick, even at only maybe an eighth of an inch. The dough was a little difficult to roll out because it kept moving backwards, but because he is a fresh pasta fan my Dad took the rolling pin and helped me out.


This is what it looked like pre cooked! If you try this, don't worry about the extra flour. You are, after all, about to toss these in water. If your pasta turns out this thick, I suggest cutting it into smaller pieces. I was so thrilled this actually worked, I even tried one pre cooked. It's about as exciting as eating dried pasta. Unless you pre flavor it somehow, I don't suggest that at all.


Boil it to al dente. With noodles this large, it took about 5-6 minutes for them to be sufficiently chewy. Of course, I chose a pot that was far too small and had some boiling over issues because I underestimated how much they expand.

 
Ta da! Add a jar of alfredo sauce, some red salt, onion powder, and garlic salt, and you have some pretty good pasta. My family really liked it and I definitely think I'll do this again. I have no idea how long these would keep in the fridge, I'm guessing about until the due date on the eggs you use.

Tips for Trying:
-Make sure you roll out the pasta as thin as you can, nearly see through
-Add and mix in one egg at a time so you stay in control of it
-Cut into small pieces, they WILL expand!

Sunday, December 20, 2009

Shenanigans


Welcome to Not a Bakery, a blog about my baking shenanigans. Cooking can be tough in college, especially in a dorm room. Some recipes can be made in a microwave, some are from the baking binges I go on when I get the full kitchen comfort of home.

I have had quite a bit of cupcake chaos in my amateur cooking adventures, and this blog will include more in the future I'm sure. I am no Anthony Bourdain or Julia Child, but some of my attempts actually turn out pretty well!

Coming up: Christmas cookies, gingerbread houses, and tomorrow making fresh pasta.

If you have any recipes or suggestions, you are more than welcome to share them.

Food link for the day: Tastespotting.com

Photo Above Right: Devil's food chocolate cake, frosting design on the sides made by a crinkle cutter normally used for cheese.